
Valentine Butterfly Crochet Pattern
I'm back with another Valentine's Day pattern! This time, I'd love to share a cute little butterfly I designed, with love-day in mind!
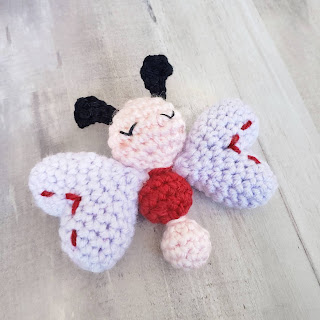

Valentine Butterfly Pattern
- Worsted weight yarn in 4 colors- for the example, I chose:
- Pink
- Blue
- Purple
- Black
- 3.5mm crochet hook
- Yarn needle
- Scissors
- Two 6mm safety eyes OR black embroidery floss
- Poly-fil stuffing
Gauge is not terribly important for this project. Make sure your stitches are tight enough stuffing doesn't show through. Bump down a hook size if you notice gaps.
Terms:
- (#) number of stitches in row
- Chain Stitch (ch)
- Decrease (dec) - two sc together
- Half Double Crochet (hdc)
- Magic Circle (MC) aka: Magic Ring
- Single Crochet (sc)
- Slip Stitch (sl st)
- Stitch/es (st/s)
- Repeat what's inside ** when applicable
- Terms in ( ) are in the same st, otherwise sts are in consecutive order.
For example: - "hdc, 3 sc, hdc" means "hdc in first st, sc in next 3 sts, hdc in last st".
- "hdc, (2 hdc), 4 sc" means "hdc in first st, 2 hdc in the next st, 1 sc in the next 4 sts"
Wings: use Pink (make 2)
Begin: make a MC, ch 1
Rnd 1: 6 sc in MC (6)
Rnd 2: inc around (12)
Rnd 3-4: sc around (12)
Fasten off this 1st part. Then, repeat "Begin - Rnd 4" to make a 2nd part, but DO NOT fasten it off.
Put your hook under the sc nearest the hook, from the inside poking outward, and into a sc on the side of the 1st piece. Sc in 2 sts to connect the two pieces together. Then, you'll be continuing on the side of the second piece for rnd 5.
Rnd 5: sc in next 10 sts, then continue around the edge of the next piece - you will sc two sts together**. Then, sc in next 9 sts (20)

Rnd 6: sc around (20)
Rnd 7: *sc in 3 sts, dec* repeat around (16)
Rnd 8: *sc in 2 sts, dec* repeat around (12)
Rnd 9: sc around (12)
Rnd 10: dec around (6)
Weave yarn in through tail with a yarn needle, cinch to close. Finish off, leaving a long tail.
Body - Part 1: use blue
Begin: MC, ch 1
Rnd 1: 6 sc in MC (6)
Rnd 2: inc around (12)
Rnd 3: *sc, inc* repeat around (18)
Rnd 4-6: sc around (18)
Rnd 7: *sc, dec* repeat around (12)
Stuff with poly-fil. Attach safety eyes if needed.
Rnd 8: dec around (6)
Weave in and out with your yarn needle, cinch to close. Fasten off, leaving a long tail.
Body - Part 2: use purple
Begin: MC, ch 1
Rnd 1: 6 sc in MC (6)
Rnd 2: inc around (12)
Rnd 3-5: sc around (12)
Stuff with poly-fil.
Rnd 6: dec around (6)
Weave in and out with your yarn needle, cinch to close. Fasten off, leaving a long tail.
Body - Part 3: use blue
Begin: MC, ch 1
Rnd 1: 5 sc in MC (5)
Rnd 2: inc around (10)
Rnd 3-5: sc around (10)
Stuff with poly-fil.
Rnd 6: dec around (5)
Weave in and out with your yarn needle, cinch to close. Fasten off.

Assemble Body & Wings
Attach body pieces 1 and 2 together using the long yarn end and your yarn needle. Fasten off. Then, attach body piece 3 to the bottom of part 2.
Connect each wing to either side between piece 1 & 2. Make sure to sew though both body pieces to add stability. Fasten off. Hide yarn ends inside the wings.
Antennae - use black
First antenna:
Leave a yarn tail a few inches long.
Ch 5, (sc, hdc, sc) in 2nd ch from hook, sl st in next 3 sts. Cut, pull through loop, leave yarn tail a few inches long. Set aside.
Second antenna:
Leave a yarn tail a few inches long.
Ch 5, TURN, (sc, hdc, sc) in 2nd ch from hook, sl st in next 3 sts. Cut, pull through loop, leave yarn tail a few inches long. Set aside.
Attach both antennae to the top of the head, about 1 st over from the MC center. Using a needle, or hook, put the yarn end up and under one of the sts. Then, tie twice. Using a yarn needle, hide both the ends inside the head.
Face - use embroidery floss
If you didn't insert safety eyes, use embroidery floss to make eyes on the front of the face.
Use a bit of blush and a small brush, or eyeshadow sponge, to apply a dab to the butterfly's cheeks. Blow excess off.
Wing Accents- use Blue
Using yarn, and a needle, add accents to each wing. One loop at the top right, two in the middle to make a "v" and one loop in the top left.


This is so adorable! Thanks for the pattern!
ReplyDelete