
Amigurumi Snowman Headband
I have a fun freebie for you today! My daughters had a "holiday headband" day at school, so I created these snowman headbands for them to wear! You can easily make it less holiday-themed by changing the colors to blue, pink, or any other fun color.

You could also just make the snowman portion if you're looking for a quick and cute amigurumi!

(Pin it for later!)
Materials Needed:
- Worsted (4) yarn in five colors (I used Lion Brand Basic Stitch - 1 skein, or a partial, of each color will make multiple headbands. You'll need a bit more white since the poms take more yarn than the rest)
- White
- Red
- Green
- Orange
- Black
- 3.5mm crochet hook
- Yarn needle
- Scissors
- Plastic Headband ( I prefer the kind with "teeth")
- 1.5" Pom Maker (or similar)
- 7mm safety eyes (or similar)**
**I do not recommend using safety eyes for children under age 3 since they pose a choking hazard. You can embroider the eyes on instead.
Terms:
- (#) : number of sts in rnd/row
- Chain Stitch (ch)
- Decrease (dec)
- Half Double Crochet (hdc)
- Increase (inc)
- Magic Circle/Ring (MC)
- Round (rnd)
- Single Crochet (sc)
- Slip Stitch (sl st)
- Stitch/es (st/sts)
- Repeat what's inside **
- (xyz): worked in same stitch
Pattern
Snowman Body - Using white yarn
(Do not sl st at the end. Work in the round for this portion!)
Begin: MC, ch 1
Rnd 1: 6 sc in MC (6)
Rnd 2: inc around (12)
Rnd 3: *inc, sc* around (18)
Rnd 4: *inc, sc in next 2 sts* around (24)
Rnd 5-8: sc around (24)
Rnd 9: *dec, sc in next 2 sts* around (18)
Rnd 10: *dec, sc in next st* around (12)
Rnd 11: sc around (12)
Rnd 12: *inc, sc in next st* around (18)
Rnd 13-15: sc around (18)
Rnd 16: *dec, sc in next st* around (12)

Stop and stuff your snowman. Insert safety eyes between rounds 14 & 15.
Rnd 17: dec around (6)
Cut, leaving a long yarn tail (you'll use this to attach the hat) and pull through. Use your yarn needle to weave the opening closed. Secure, but do not cut.
Cut, leaving a long yarn tail (you'll use this to attach the hat) and pull through. Use your yarn needle to weave the opening closed. Secure, but do not cut.
Hat - begin with white yarn
(worked in joined rounds)
Begin: Ch 22
(Adjust as necessary - chain should fit around the snowman's head snugly)
Rnd 1: sc in 2nd ch from hook and across (21). Sl st to first sc. Switch to RED.

Rnd 2: ch 1, sc around (21) sl st to 1st st.
Rnd 3: ch 1, *dec, sc in next 5 sts* around (18) sl st to 1st st.
Rnd 4: ch 1, sc around (18) sl st to 1st st.
Rnd 5: ch 1, *dec, sc in next 4 sts* around (15) sl st to 1st st.
Rnd 6: ch 1, sc around (15) sl st to 1st st.
Rnd 7: ch 1, *dec, sc in next 3 sts* (9) sl st to 1st st.
Rnd 8-9: ch 1, sc around (9) sl st to 1st st.
Rnd 10: ch 1, *dec, sc in next st* around (6) sl st to 1st st.
Rnd 11: ch 1, sc around (6) sl st to 1st st.
Cut yarn leaving a long tail (to sew to base). Pull through. Weave through the FLO on Rnd 11 and pull. Secure end, but don't cut. Bend the top of the hat down toward the bottom opening. Sew the tip of the hat so it touches right above the white portion.

Use the beginning white yarn end to close the small gap from Rnds 1 and 2 of hat base.
Hat ball - Use white yarn
Begin: MC, ch 1
Rnd 1: 6 sc in the MC
Rnd 2: inc around (12)
Cut, leaving a long tail, pull through and weave in and out of each st from Rnd 2. Pull snug to make the ball. Secure the end, and then use it to attach the ball to the tip of the hat.

Using the white yarn end on the snowman's head, attach the hat to the head. I put mine at a slight angle to the side, sloping just enough to touch one eye. Weave the white yarn in and out of the hat stitches around the head but don't pull snugly or he'll lose shape. Secure and fasten off.

Scarf: First part - Use green yarn
Begin: ch 3
Row 1: sc in 2nd st from hook, and next st (2) ch 1, turn
Row 2-19: sc across (2) ch 1, turn


The scarf should fit snugly around the snowman's "neck" area. Cut, leaving a long end. Use the end to sew the two ends of the scarf together around the snowman's neck. Then, using the same end, weave in and out of the scarf around the neck (about every 1-2 rows). Pull to cinch the scarf around his neck. This helps make it look a bit more defined. Secure, and fasten off.
Scarf: Second part - Use green yarn
Begin ch 3
Row 1: sc in 2nd st from hook, and next st (2) ch 1, turn
Row 2-7: sc across (2) ch 1, turn (Adjust length of scarf with more/less rows)
Cut, leaving a long tail. Attach the second scarf piece underneath the edge of the first piece, so it hangs down. Secure and fasten off.

Cut 3 pieces of green yarn, about 2-3" long. Fold in half and loop through 3 spots on the end of "scarf second piece", then pull the ends through the folded loop. This creates the fringe on the end.

Buttons - Use black yarn
Insert your yarn needle in the back of the snowman body, coming out at the front where you want your first button. Loop over and around 1 stitch, about 3-4 times. Then, insert your needle down into a stitch a few rounds lower. Repeat to make the second button. Insert your needle back out the same spot of the body you first entered. Cut yarn. Tie ends together snugly and poke them into the snowman to hide.


Nose - Use orange yarn
Ch 3, hdc in 2nd ch from hook, sl st in last.
This makes a sort of funny triangle shape. Weave in one yarn end and leave the other one long. Attach the nose to the snowman's face so it sticks out. You may need to squish the nose a bit with your fingers to shape it into more of a point.

This ends the snowman portion! If you'd like to turn him into a headband, continue onto the next portion of the pattern.


Pom Poms- Use white yarn
Make 4 white poms with your small pom-maker. The size isn't too important, but you'll want to make sure they aren't too big- if they're too heavy your headband might tip over more. Trim your poms so all the edges are even.
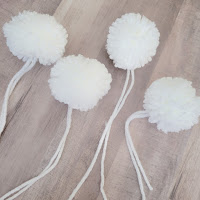
Leave both ends of the poms long - you'll use these to tie around the headband.
Headband - Use white yarn
Start at one end of the headband, a couple inches from the end, and tie on white yarn. Leave the end long enough to secure. You will wrap the yarn around the headband over and over, until it is evenly covered all the way to the other side. Tie your yarn snugly around the 2nd side (a couple inches from the end). Cut, and then using your yarn needle, secure the end by going up and under the yarn, then back down. Repeat this on the first side as well.

Its important to make sure your yarn is snug when you do this so it doesn't shift around while being worn. The "teeth" on the headband will help hold the yarn on.
Attaching Snowman/Poms
Attach white yarn to the bottom of the snowman using your yarn needle. Sew your snowman onto the middle of the headband by weaving yarn under and over, through the bottom of the snowman (securing in rnds 1-3, not just rnd 1, will make it more stable). Push your needle through the yarn wrapped around the headband as well. The goal is to make it look as nice as possible, but also be very stable so it doesn't tip or flop around while being worn.

Tie one pom just to the side of the snowman. Then, use your needle to secure the yarn ends through the headband yarn, around the headband, etc. Repeat with the other three poms as well - two on each side of the snowman. I pressed mine right up against each other.

Trim and hide all your ends and check your headband for "wobbliness". If everything seems secure... you're done!


Enjoy! Please get in touch with any questions!
Like the pattern? Please review/favorite on Ravelry, and share your finished snowman headbands with me on Instagram! Thank you!

Comments
Post a Comment